Tulong:VisualEditor/Gabay sa paggamit
| Paalala: Kapag binago ninyo ang pahinang ito, pumapayag kang ilabas ang ambag mo sa ilalim ng CC0. Basahin ang Mga Pahina ng Tulong sa Pampublikong Dominyo para sa mas maraming impormasyon. |
| VisualEditor portal |
|---|
 |
| General |
| About |
| Help with the launch |
| Kung nais mong subukin ang VisualEditor nang hindi nagbabago ng alinmang artikulo, narito ang isang pahina kung saan malayang kang masusubok ito. Hindi mo kinakailangan ang isang akawnt upang magamit ang VisualEditor sa pahinang iyon. |
Sinisimulan ang VisualEditor
Pagsisimula: ang toolbar ng VisualEditor
| Makikita ang toolbar ng VisualEditor sa ibabaw ng iskrin kapag nagsimula kang mamatnugot gamit ito. Kasama rito ang ilang kilalang mga icon: | |
| Ibalik at Gawin muli ang mga nagawang pagbabago | |
 |
Talang pahila-pababa ng mga pamuhatan: pinapayagan ka nito na baguhin ang ayos ng talata. Upang baguhin ang estilo ng talata, ilagay ang cursor sa talata at pumili ng aytem sa menu (hindi na kailangang i-highlight ang anumang teksto). Ang mga pamagat ng seksyon ay naka-format "$format", at ang mga subseksyon ay "$subheading2", "$subheading3", at iba pa. To change the style of a paragraph, put your cursor in the paragraph and select an item in this menu (you don't have to highlight any text). Section titles are formatted "Paulo", and subsections are "Sub-pamuhatan 1", "Sub-pamuhatan 2", and so on. Ang normal na format para sa mga letra ay "Talata" |
 |
Formatting: Sa pagklik ng "A", bubukas ang menu.
If you have not selected any text, then when you press the "A" to open the menu, and then select an item, that formatting will apply to the text that you start typing, from wherever your cursor is located. |
 |
Linking tool: Ang kadena ay ang gamit sa pagkakawing. Kapag kinlik (kalimitan matapos pumili ng mga teksto) ay magbubukas sa kawing sa pakikipag-usap. |
 |
Magsipi menu: The "Magsipi" menu is used to add inline citations (also called "footnotes" or "references"). All projects have access to basic reference formatting and the ability to reuse citations by using this menu. |
 |
Tukuyin button: If the Citoid service and/or citation tool is enabled on your wiki, you will see a Tukuyin button instead of a Magsipi menu.
(Ang mga panuto para sa pagdadagdag ng lokal na sanggunian para sa Manwal menu ng isang partikular na wiki ay matatagpuan sa VisualEditor/Citation tool.) Instructions for enabling the Automatiko tab are available at Enabling Citoid on your wiki The citoid service tries to fill out citation templates automatically. |
 |
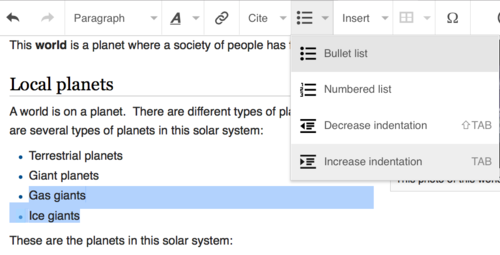
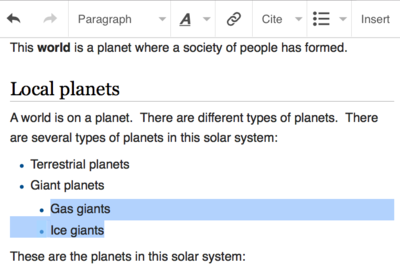
Mga talaan at pagpapalugit: Pinapayagan ka ng unang dalawang ikono na gumawa ng mga talang nakabilang o nakapunglo. Pinapayagan ka naman ng huling dalawa na damihan o bawasan ang antas ng pagpapalugit ng nilalaman. |
 |
Isingit: Maaring maiba ang "Isingit" menu sa ilang mga proyekto. Nasa ibaba ang lista ng lahat ng mga pagpipiliang maaring makita.
|
| Special character insertion: Ang icon na "Natatanging panitik" (Ω) sa "Isingit" menu, kapag kinlik, ay magpapakita ng dayalogo na mayroong ispesyal na mga characters. Sa pamamagitan ng pag-klik sa isang partikular na character, maipapaloob mo ito sa teksto. Kasama sa mga ispesyal na character na ito ang ilang mga pamatayang simbolo, diin at mga simbolong matematiko. (Maaring gawing pasadyang panlokal ang listahang ito. Tingnan ang VisualEditor/Special characters para sa panuto.) | |
| The Edit notices button displays any notices for the page. | |
 |
The Mga kagustuhan ng pahina menu is to the left of the Ilathala ang binago button and the Switch editor menu. On this menu there is a button to open an Mga kagustuhan dialog with the following (left side) tabs:
The tabs of the Options dialog are also displayed in the Mga kagustuhan ng pahina menu and can be opened by clicking on it. Furthermore the Mga kagustuhan ng pahina menu contains the items View as left-to-right or View as right-to-left and the item Hanapin at palitan, which opens a bar, where you can insert words or regular expressions you are searching for and those to replace them with, together with several buttons for options. |
| The Switch editor button is next to the Ilathala ang binago button. It allows you to switch to the wikitext editor. | |
Itinatala ang mga pagbabago
Pagbabago sa mga kawing
 |
Maaaring magdagdag ng mga kawing sa pamamagitan ng icon na "Link" (mga kadena) na nasa toolbar, o sa pamamagitan ng paggamit ng shortcut na Ctrl+K (o ⌘ Command+K kung gamit ang Mac).
If you select (highlight) text and then press the "Link" button, that text will be used in creating the link. For a link that involves only one word, you can either select that word or just put the cursor within that word. |
 |
Kung gamit mo ang alinman sa buton o ang shortcut, magbubukas ang diyalogo na kung saan maari mong i-type ang kawing.
Susubukin ng VisualEditor na tumulong sa "panloob" na kawing sa pamamagitan ng paghahanap sa mga maaring kapareha habang nagsisimula kang mag-type. Kapag naipasok o napili mo na ang kawing, maaari mong pindutin ang ↵ Enter, i-klik ang labas ng kahon, o pindutin ang ikono ng pagsara (<). Makikita mo ang kawing mo sa pahina ng VisualEditor, ngunit hindi ito maitatala hangga't hindi mo pa naitatala ang pahina. |
 |
Upang mai-link sa isang web page sa isa pang website, magkatulad ang proseso: Piliin ang tab na "Panlabas na link", at maglagay ng isang URL sa kahon. |
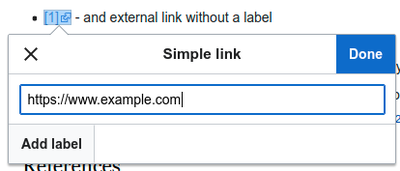 |
External links without labels look like this: [1]. Maaari mo itong maidagdag sa pamamagitan ng paglalagay ng iyong cursor papalayo mula sa kahit anong salita (hal. matapos ang patlang). Buksan ang kagamitan para sa pagkawing sa pamamagitan ng pag-klik sa buton o pindutin ang mga tekladong pang-shortcut. I-type ang URL sa kahon, at i-klik ang buton na "Done" upang isingit ang kawing. |
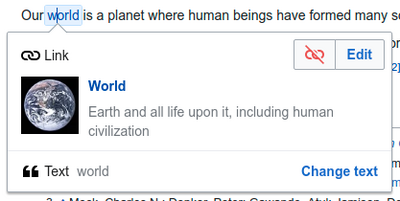 |
Upang baguhin o tanggalin ang isang umiiral na kawing, i-klik mula sa loob ng teksto ng kawing, pindutin ang icon na "Link" na lalabas malapit rito. Ang kahong pandayalogo ay lalabas, para sa iyong gagawing pagbabago. (Maaari ka ring makarating sa kahon pandayalogo sa pamamagitan ng Ctrl+K shortcut sa teklado.) When a link is selected, it appears as blue framed.
Sa kahong pandayalogo, maari mo nang palitan kung saan magagawi ang kawing. Maaari mo ring tanggalin ang lahat ng kawing sa pamamagitan ng pagpindot sa buton na "Tanggalin" sa gawing kaliwang ibabang sulok ng kahon. You can also open the link's target in another window by pressing on the copy of the link in the dialog box. (You might want do this to check if an external link is valid.) If you want to exit the link label (the text displayed as a link) or continue to write after this link, you can press →:
To edit the link label of an existing link, press within the link label and type the new one. But if you want to replace the entire label, please note:
|
Pagpapalit sa mga sanggunian
- For further information, see Help using citation templates or Help using citoid's Automatiko tab
Determining which system is in place | |
| Your wiki may use one of three footnote systems. The one shown on the right is the simplest system, where the "Magsipi" menu does not include any citation templates. If your wiki uses this system, then everything you need to know about footnotes is on this page. |  |
| In the second system, you again start by pressing the Tukuyin button. Then a dialog box opens, which includes several popular citation templates set up for quick access in the "Manwal" tab. If your wiki uses this system, then you will find more details at Help:VisualEditor/User guide/Citations-Templates |  |
| In the third system, you again start by pressing the Tukuyin button. Then a dialog box opens, which includes an automatic citation process using the citoid service under the Automatic tab. If your wiki uses this system, you will find more details at Help:VisualEditor/User guide/Citations-Full |  |
|
Pagpapalit sa umiiral na sanggunian | |
| To edit an existing reference, press on it where it appears in the text (usually as a bracketed number). You will see either a "Sanggunian" icon (bookmark) or an icon (and name) for the template that was used to create this reference. In either case, pressing on the "Baguhin" button will open a dialog where you can edit the reference. |  |
| For the "Sanggunian" icon, pressing "Baguhin" opens the reference dialog. To start changing the reference information, press on it.
Maraming wiki ang gumagamit ng padron upang bigyan ng kaanyuan ang mga sanggunian. Kung gumamit ng isang padron sa iyong sanggunian, ang lahat ng teksto sa padron ay maha-highlight kapag kinlik ang impormasyon ng sanggunian. Kung ginamit ang isang padron at na-klik mo ang impormasyon sa padrong iyon, ang icon na $template (piraso ng puzzle) ay lalabas. I-klik ang naturang icon upang baguhin ang nilalaman ng padron sa mini-editor dialog template. |
 |
| If what appears when you press on a reference is an icon for a standard template for citations (an example is at right), then pressing "Baguhin" will open the template editor dialog. |  |
| Sa loob ng padrong mini-editor, maaari mong idagdag o alisin ang mga uri ng impormasyon o palitan ang kasalukuyang nilalaman. Ang mga fields (parameters ng padron) na may laman ang na dapat na nakikita sa una. Upang magdagdag ng fields, i-klik ang "Add" sa ibaba ng mini-editor. |  |
| I-klik ang "Ilapat ang mga pagbabago" kung ikaw ay tapos na. | |
Muling paggamit sa umiiral na sanggunian | |
| Kapag may sanggunian na ang pahina na patungkol sa mga teksto na nais mong lagyan ng pinaggalingan, maaari mo nang magamit muli ang nasabing sanggunian.
Upang magamit muli ang umiiral na sanggunian, ipatong ang cursor sa katawan ng teksto na nais mong lagyan ng bagong sangguniang (bilang) para sa talababang iyon. I-klik ang "Re-use reference" mula sa "$cite" menu. (Note: If your wiki has the second or third footnote system described above, you'll see a "Gamiting muli" tab, in a dialog, instead of a "Gamitin muli" item on the "Magsipi" menu.) |
 |
| In the Sanggunian dialog, look at the list for the reference you want to reuse, and select it. If there are many references, you can use the search box (labeled "Maghanap sa mga kasalukuyang sinipi") to list only those references that include certain text. |  |
Pagdagdag ng bagong sanggunian | |
| To add a citation using the "Magsipi" menu, place your cursor where you want to add it in the text. Then click "Payak". |  |
Using the "Payak" citation | |
| Shown here is what you will see if you select the basic references item. Sa editor ng sanggunian, maaari mong dagdagan, baguhin at paanyuan ang iyong sanggunian.
Maari mong ilagay ang isang reference sa isang partikular na grupo, kaya lamang, karaniwan, ito ay hinahayaang bakante. (Ang pagpipiliang ito ay ginagamit upang ipakita ang mga grupo ng sanggunian na may kasangkapang "Talasanggunian".) |
 |
| Kung magdadagdag ka ng bagong sanggunian at nais mong isali ang isang padron dito, i-klik ang ikonong Pagsasali (piraso ng puzzle) sa toolbar ng editor ng sanggunian. |  |
| Then, look for the template you want to use, add it and edit it as you would any other template. (See the Editing templates section, below, if you need more information about templates.)
Kapag natapos na ang pagbabago sa iyong panibagong padron, i-klik and "Ilapat ang mga pagbabago" upang magbalik sa Reference editor, at i-klik muli ang "Ilapat ang mga pagbabago" upang magbalik naman sa pahinang iyong binabago. |
 |
| Kung wala pang talasanggunian sa pahina (halimbawa, kung idadagdag mo pa lang ang unang sanggunian ng pahina), kailangan mong tukuyin king saan makikita ng mga mambabasa ang listahan ng sanggunian at ang kanilang teksto.
Ipuwesto ang cursor sa lugar kung saan nais mong ipakita ang mga sanggunian (karaniwa'y nasa ilalim ng pahina), buksan ang menu na "Isingit" at i-klik ang "Talasanggunian" icon (tatlong mga libro). |
 |
| If you are using several groups of references, which is relatively rare, you can specify the group in this dialog. Only the references that belong to that group will be displayed on the page at the location where you are placing the group.
The final step in the References list dialog is to press "Isingit". |
 |
Using standard cite templates | |
| Your local wiki may have added extra citation templates to the "Magsipi" menu. If so, you have quick access to the most-used citation templates for your wiki. (Instructions for adding extra citation templates to your local wiki are available at VisualEditor/Citation tool.) |  |
| Pressing on a template icon such as "Cite book" will take you into the template editor for that template. Important information fields may be marked with an asterisk. While the most common fields will be shown, not all of them are required. |  |
| To add more parameters, scroll down in the template editor and press on the "Add" option.
Press on "Isingit" when you are done. |
 |
Editing images and other media files
Uploading images
Editing media galleries
Editing templates
The powerful MediaWiki template system lets you insert dynamic content, text from other pages, and much more. For a detailed explanation and examples, see the Templates help page.
In the VisualEditor you can search for a relevant template, add an invocation or transclusion on the page you’re editing and, if needed, add custom content using parameters.
Insert new template
| To add a template to a page, place your cursor at the position on the page where you want the template to be inserted. Then open the Isingit menu and select " |
 |
| Find the template you want to insert by typing either its name or a relevant keyword. Results containing the search term in either the name or description will display in a dropdown. This should help you find a relevant template, even if you don’t know its exact name.
If you’re having trouble finding the kind of template you want by using keywords, you can look on other wiki pages with similar content and view or edit the page source to see which templates are in use. When you find the desired template’s name, you can type it into this field to insert it here. |
 |
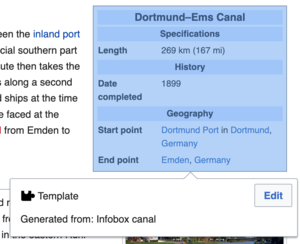
| You can also edit a template that’s already on a page. When you select the template you want to edit, it turns blue, and a box appears displaying " |
 |
| Some templates are not visible to someone reading a page. In the visual editor, such hidden templates are still shown so that you can click and edit or delete them. The name of the template will be shown next to the puzzle icon and both will be grayed out. |  |
Template parameters | |
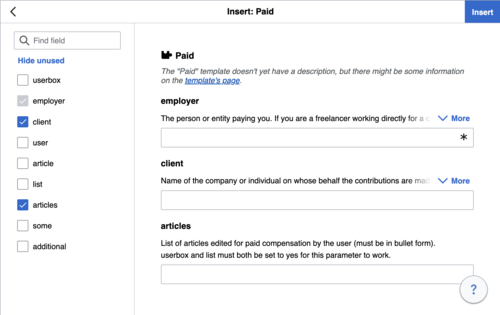
| You’ll see this dialog box when you’re adding a new template or editing one already in place. What you see in the box depends on whether the template in question contains TemplateData, helpful metadata added by other editors to make it easier to edit templates in the Visual Editor.
When a template contains TemplateData, the VisualEditor can use it to present annotated fields for you to fill in.
|
 |
| You can disable any optional parameter (which have blue checkboxes on the left side). If a parameter’s checkbox is grayed out and not clickable, the template requires that parameter, so it can’t be disabled.
When you insert a new template, you may find that some optional parameters are pre-selected. That means the author(s) of the template recommends the use of those parameters. It’s best to review all parameters that will be used in a template to ensure you understand their use. Clicking an unchecked parameter adds it to the template. Clicking a parameter that’s already been added takes you to the parameter’s input field. Some template parameters will show as “deprecated”. Don’t use deprecated parameters when inserting a template; they’re only visible to you because those parameters are in use on older pages where this template was included. |
 |
Adding undocumented parameters | |
| If you’re inserting or editing a template whose author hasn’t laid out its parameters in TemplateData, it has what we call “undocumented” or “unnamed parameters”. In these cases, you should consult the page for the template itself. There you can learn how to correctly employ and work with all of the template’s parameters. This includes learning the exact names of the parameters as written by the template author.
If you find in the documentation that the template expects parameters without names, fill in numbers as placeholders for the parameter names using the undocumented parameter input, then add text to the values you want to provide as you normally would. Example:
If you accidentally include nonexistent, misspelled or erroneous parameters, the values you enter for those parameters won’t show up on the page you’re editing. |
 |
Autogenerated parameters | |
| In this example, the template in question lacks TemplateData but it was possible to autogenerate the parameters. This means that the undocumented parameters have already been added for you, but the names may not be easily understandable and the dialog cannot display any directions or descriptions. As a result the dialog box provides a link to the template’s documentation, which should help you deduce and fill in the template’s various parameters. |  |
Editing multi-part template content | |
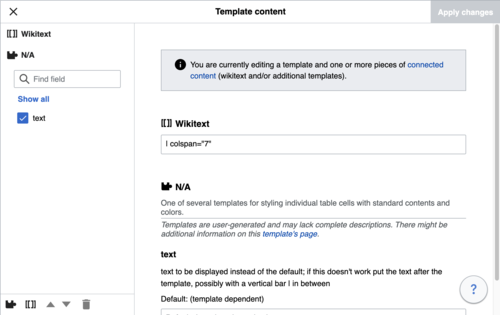
| During editing, you may open template content consisting of multiple templates or a single template linked to some wikitext. This differs from the nested templates described below. In this case, the templates are better visualized as being stacked or connected.
This content often contains “unbalanced templates,” templates which are incomplete on their own and need to be paired with some wikitext or another template in order to function. These related pieces of template content must be created in wikitext, but can be edited in the VisualEditor. In these cases you will see a notice at the top of the dialog to signal the situation and a specialized toolbar will be visible at the bottom of the sidebar. There you can use the icon buttons to add additional templates, additional wikitext, delete elements or change their order. |
 |
Nested templates | |
| Templates can include other templates as the value for parameters. You’ll recognize it when you see a parameter whose value contains the double curly braces ( {{ }} ) denoting a template.
The VisualEditor can’t present this template within a template (a nested template) using the editor’s easy-to-use interface, so if you want to nest a template yourself, you’ll need to understand how to add the template by hand in wikitext into the appropriate parameter field. |
 |
Completing your edit | |
| When you have finished editing a template, you can click "Ilapat ang mga pagbabago". Then you can preview your edit and make sure it looks the way you want and expect.
You may also see an error message, which (like the other TemplateData mentioned above) is community-provided content and may vary in usefulness. You may need to consult the template’s own documentation to get to the bottom of some errors. If you’re still having trouble, consider posting about your problem on the template’s talk page. |
|
Removing a template | |
| To remove a template in the VisualEditor, click the template box. Press the "Delete" or "Backspace" key on your keyboard. The template will disappear from the page. |  |
Editing on mobile | |
| When editing a template on a page using the VisualEditor on a mobile device, you’ll see that the sidebar starts out hidden. You can make it visible by pressing the “Show/hide options” button. |  |
Substituting templates | |
| When you insert a template in a wiki page, its content and appearance are reevaluated every time the page loads, based on the template code and the values of its parameters. This means if someone updates the code of a template, then every page which uses that template will also get updated when they publish.
There’s another, much less common way to use templates, though, and that’s to substitute a template. Doing this permanently includes the template content just as it appears at the moment you insert it. It will not update if the template code is later changed. Most users won’t ever need to resort to substitution. Substitution is typically only useful when you need to capture the exact appearance of one version of a template, such as when content is under development and needs evaluation. To substitute a template in the VisualEditor, insert a template using the name syntax When you’re finished, press “Isingit”, which will insert the template content as you see it. |
 |
Editing lists
Editing tables
Pamamatnugot sa mga kategorya
 |
To edit categories, on the "Mga kagustuhan ng pahina" menu, press the "Mga kategorya" item. |
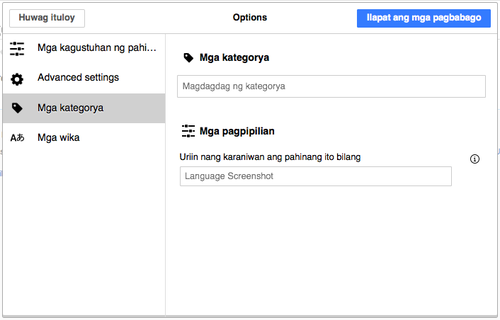 |
Pressing on "Mga kategorya" opens a dialog that lists existing categories and allows you to add new ones, and to delete existing categories.
You also have the option of setting or changing the general (default) sorting key, which determines where the page appears when listed with other pages in the same category. For example, the default sorting key for the article "George Washington" is "Washington, George". In the category "Presidents of the United States", the article is listed under the letter "W", not the letter "G". |
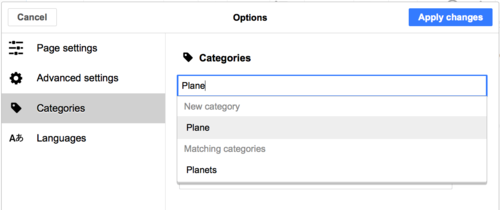 |
To add a category for a page, type the name of the category into the field "Magdagdag ng kategorya". As you type, the visual editor will search for possible matching, existing categories. You can either select an existing category, or you can add a category that doesn't yet have its own category page. (Until that category page is created, your new category will show as a red link after you publish all your editing changes.) |
 |
Upang tanggalin ang isang umiiral na kategorya, i-klik mo ito at i-klik ang ikonong "Tanggalin" (basurahan) sa kahong diyalogo na mabubuksan.
Pressing on a category also allows you to specify a sorting key for that specific category. Such a sorting key overrides the default sorting key. |
| I-klik ang "Ilapat ang mga pagbabago" kapag tapos ka nang mamatnugot sa mga kategorya upang makabalik sa editor ng pahina. | |
Editing page settings
Editing maps
 |
You can add and change maps. See Help:VisualEditor/Maps. |
Editing mathematical formulae
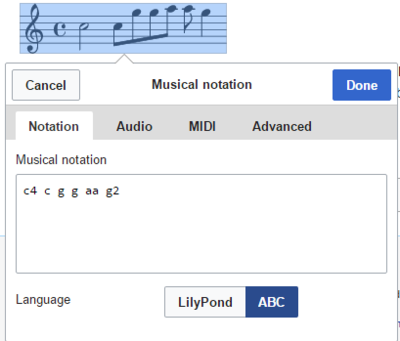
Editing musical scores
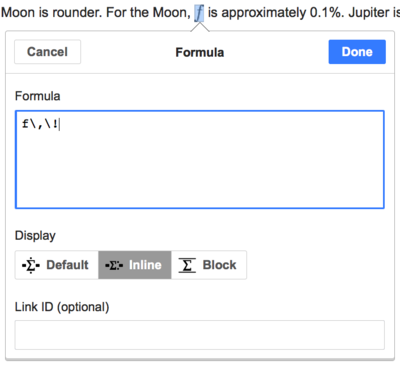
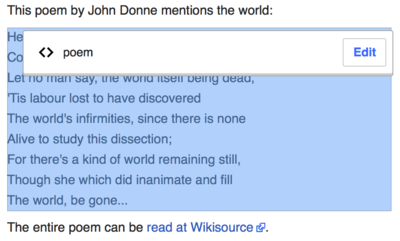
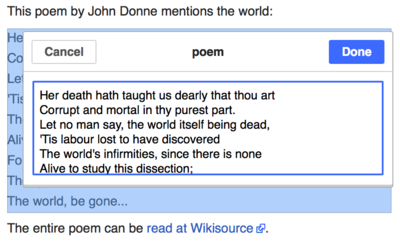
Pamamatnugot sa mga pormulang matematiko at iba pang natatanging bagay
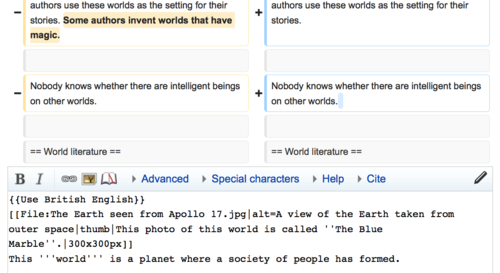
Switching between the visual and wikitext editors
Mga kombinasyong pantipaan
Many editors are used to entering wikitext directly, especially bold, italics and wikilinks. Keyboard shortcuts allow to quickly apply formatting without having to use toolbar items. Here are some of the most common shortcuts in the visual editor:
| Kombinasyon sa PC | Gawain | Kombinasyon sa Mac |
|---|---|---|
| Ctrl+B | Makapal | ⌘ Cmd+B |
| Ctrl+I | Nakapahilis | ⌘ Cmd+I |
| Ctrl+K | Maglagay ng kawing | ⌘ Cmd+K |
| Ctrl+X | Tanggalin | ⌘ Cmd+X |
| Ctrl+C | Kopyahin | ⌘ Cmd+C |
| Ctrl+V | Ipaskil | ⌘ Cmd+V |
| Ctrl+Z | Ibalik | ⌘ Cmd+Z |
Also see the full list of all keyboard shortcuts.


