Hjælp:VisualEditor/Brugerguide
| Bemærk: Når du redigerer denne side, accepterer du at udgive dine bidrag under CC0. Se Public Domain Help Pages for mere info. |
| VisualEditor portal |
|---|
 |
| General |
| Om |
| Hjælp med starten |
| Hvis du kunne tænke dig at prøve VisualEditor uden at redigere i en artikel, så er der en side her, hvor du frit kan afprøve den. Det er ikke nødvendigt at have en konto for at bruge VisualEditor på den side. |
Åbne VisualEditor
Kom godt i gang: VisualEditors værktøjslinje
| VisualEditors værktøjslinje vises øverst på skærmen, når du begynder at redigere. Den rummer nogle velkendte ikoner: | |
| Fortryd og Annuller fortryd de ændringer som du har lavet. | |
 |
Headings pull-down menu: allows you to change how the paragraph is formatted. To change the style of a paragraph, put your cursor in the paragraph and select an item in this menu (you don't have to highlight any text). Section titles are formatted "Overskrift", and subsections are "Underoverskrift 1", "Underoverskrift 2", and so on. The normal format for text is "Afsnit". |
 |
Formatting: Pressing the "A" opens a menu.
If you have not selected any text, then when you press the "A" to open the menu, and then select an item, that formatting will apply to the text that you start typing, from wherever your cursor is located. |
 |
Linking tool: The chain icon is the linking tool. Pressing on it (usually after selecting some text) opens the link dialog. |
 |
Kilde menu: The "Kilde" menu is used to add inline citations (also called "footnotes" or "references"). All projects have access to basic reference formatting and the ability to reuse citations by using this menu. |
 |
Citér knap: If the Citoid service and/or citation tool is enabled on your wiki, you will see a Citér button instead of a Kilde menu.
Instructions for adding local citation templates to the "Manuel" tab at a specific wiki are available at VisualEditor/Citation tool. Instructions for enabling the Automatisk tab are available at Enabling Citoid on your wiki The citoid service tries to fill out citation templates automatically. |
 |
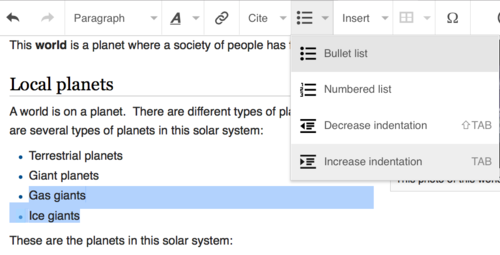
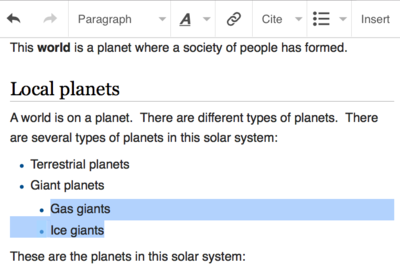
Lister & indrykning: De første to ikoner giver dig mulighed for at lave henholdsvis nummererede lister og punktopstillinger. De sidste to ikoner giver mulighed for at op- eller nedgradere niveauet for indrykningen af indholdet. |
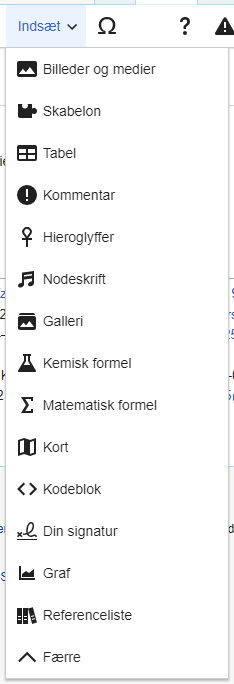 |
Insert: Denne rullemenu giver adgang til blandt andet tilføjelse af referencer eller indsættelse af billeder og skabeloner (indlejringer).
|
| Indsættelse af specialtegn: Ikonet "specialtegn" åbner et undervindue med specielle tegn, der kan indsættes i teksten. Dette indbefatter visse standardsymboler, accenter og matematiske symboler. (This list may be customized locally. See VisualEditor/Specieltegn for instructions.) | |
| The Edit notices button displays any notices for the page. | |
 |
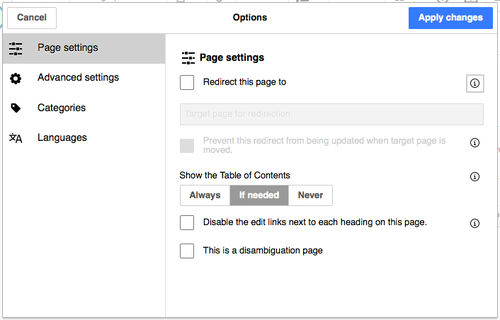
The Sideindstillinger menu is to the left of the Offentliggør ændringer button and the Skift editor menu. On this menu there is a button to open an Indstillinger dialog with the following (left side) tabs:
The tabs of the Indstillinger dialog are also displayed in the Sideindstillinger menu and can be opened by clicking on it. Furthermore the Sideindstillinger menu contains the items Vis som venstre-til-højre or Vis som højre-til-venstre and the item Søg og erstat, which opens a bar, where you can insert words or regular expressions you are searching for and those to replace them with, together with several buttons for options. |
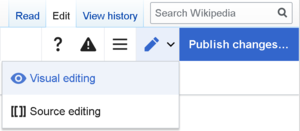
| The Skift editor button is next to the Offentliggør ændringer button. It allows you to switch to the wikitext editor. | |
Udgiv ændringer
Redigere links
 |
Links kan tilføjes med "Link"-ikonet (led i en kæde) i værktøjslinjen, eller ved hjælp af genvejen Ctrl+K (eller ⌘ Command+K på Mac).
If you select (highlight) text and then press the "Link" button, that text will be used in creating the link. For a link that involves only one word, you can either select that word or just put the cursor within that word. |
 |
Uanset om du bruger knappen eller genvejen, så vil en dialogboks åbne op, hvor du kan skrive et link. VisualEditor vil prøve at hjælpe dig med interne links (links til andre Wikipedia sider) ved at sammenligne efterhånden som du skriver.
The link tool will try to help with internal links by searching for likely matches. Når et link er skrevet eller valgt, så tast ↵ Enter, klik udenfor boksen eller på lukke-ikonet (<). Dit link vil nu være synligt i VisualEditor, men vil ikke blive gemt før du gemmer hele siden. |
 |
For at linke til en webside på et andet websted er processen ens: Vælg fanen "Ekstern henvisning", og indtast en URL i feltet. |
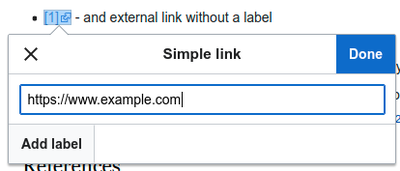 |
External links without labels look like this: [1]. You can add these by placing your cursor away from any word (e.g., after a space). Open the link tool by pressing on the button or pressing the shortcut keys. Type the URL in the box, and press the "Færdig" button to insert the link. |
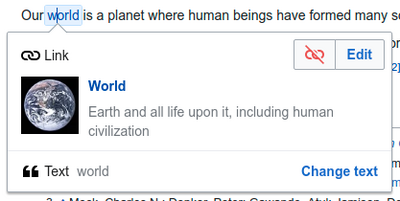 |
To change or remove an existing link, press within the text for that link, then press the "Link" icon that appears near it. The dialog will appear, for editing. You can also get to the dialog with the Ctrl+K keyboard shortcut. Når et link er valgt fremstår det med en blå ramme.
Man kan nu redigere linket og derefter trykke ↵ Enter-tasten for at gemme. Hvis linket ønskes helt fjernet, så klik på skraldespands-ikonet. You can also open the link's target in another window by pressing on the copy of the link in the dialog box. (You might want do this to check if an external link is valid.) If you want to exit the link label (the text displayed as a link) or continue to write after this link, you can press →:
To edit the link label of an existing link, press within the link label and type the new one. But if you want to replace the entire label, please note:
|
Redigering af henvisninger
- For further information, see Help using citation templates or Help using citoid's Automatisk tab
Determining which system is in place | |
| Your wiki may use one of three footnote systems. The one shown on the right is the simplest system, where the "Kilde" menu does not include any citation templates. If your wiki uses this system, then everything you need to know about footnotes is on this page. |  |
 | |
| In the second system, you again start by pressing the Citér button. Then a dialog box opens, which includes several popular citation templates set up for quick access in the "Manuel" tab. If your wiki uses this system, then you will find more details at Help:VisualEditor/User guide/Citations-Templates |  |
| In the third system, you again start by pressing the Citér button. Then a dialog box opens, which includes an automatic citation process using the citoid service under the Automatic tab. If your wiki uses this system, you will find more details at Help:VisualEditor/User guide/Citations-Full |  |
|
Redigering af en eksisterende reference | |
| To edit an existing reference, press on it where it appears in the text (usually as a bracketed number). You will see either a "Reference" icon (bookmark) or an icon (and name) for the template that was used to create this reference. In either case, pressing on the "Rediger" button will open a dialog where you can edit the reference. |  |
| For the "Reference" icon, pressing "Rediger" opens the reference dialog. To start changing the reference information, press on it.
Mange wikier bruger skabeloner til formatering af referencer, så de opfylder en bestemt standard. Du vil opdage dette, hvis du redigerer en eksisterende reference, der skifter farve til blå, når du markerer den. If a template was used and you press on the reference information, then the Skabelon icon (puzzle piece) will appear with some information. Press on the "Rediger" button to edit the content of the template in the template editor dialog. |
 |
| If what appears when you press on a reference is an icon for a standard template for citations (an example is at right), then pressing "Rediger" will open the template editor dialog. |  |
| Inside the template editor, you can add or remove types of information or change current content. Only fields (template parameters) that have content will show, initially. To add fields, press on "Add" at the bottom of the editor. |  |
| Klik på "Anvend ændringer" når du er færdig. | |
Genbrug af eksisterende reference | |
| If the page already contains a citation that applies to the text you want to source, then you can choose to re-use that existing citation.
For at bruge en eksisterende reference, behøver du blot at placere markøren det sted, du ønsker at tilføje den, og klikke på "⧼visualeditor-dialogbutton-reference-tooltip⧽"-ikonet (bogmærke) fra "More"-menuen. (Note: If your wiki has the second or third footnote system described above, you'll see a "Genbrug" tab, in a dialog, instead of a "Genbrug" item on the "Kilde" menu.) |
 |
| Hvis der er mange referencer, kan du bruge søgefeltet (markeret med "⧼visualeditor-reference-input-placeholder⧽") til kun at vise referencer, der matcher den givne tekst. Find den reference, du ønsker at genbruge, og vælg den. |  |
Tilføje en ny henvisning | |
| For at tilføje en ny reference skal du placere markøren det sted, den skal tilføjes, og derefter klikke på "⧼visualeditor-dialogbutton-reference-tooltip⧽"-ikonet (bogmærke) i "More"-menuen i værktøjslinjen. Then click "Grundlæggende". |  |
Using the "Grundlæggende" citation | |
| Shown here is what you will see if you select the basic references item. I referenceredigeringen, kan du tilføje, redigere og formatere din henvisning.
Du kan knytte referencen til en bestemt gruppe; dette bruges til at vise grupperinger af referencer med "⧼visualeditor-dialog-referencelist-title⧽"-værktøjet |
 |
| Hvis du tilføjer en ny reference og ønsker at den skal indeholde en skabelon, så klik på Skabelon (puslebrik) i menuen "Indsæt"-værktøjslinjen i referenceredigeringen. |  |
| Find derefter de skabeloner, du vil benytte, tilføj dem og rediger dem, som du ville gøre det med en allerede eksisterende skabelon.
Klik på "Apply changes" for at komme tilbage til referenceredigeringen, og klik igen for at komme tilbage til siden. |
 |
| Hvis der ikke allerede er en referenceliste på siden (hvis du f.eks. er den første til at tilføje en reference), er du nødt til at tilføje den, for at teksten i din reference skal kunne ses.
Placér markøren, det sted, referencen skal fremgå (almindeligvis i bunden af siden), og klik derefter på "⧼visualeditor-dialog-referencelist-title⧽"-ikonet (tre bøger) for at tilføje den. |
 |
| Hvis du har oprettet en referencegruppe, kan du angive en gruppe i dialogboksen til selektivt at vise referencer, der hører dertil.
The final step in the References list dialog is to press "Indsæt". |
 |
Using standard cite templates | |
| Your local wiki may have added extra citation templates to the "Kilde" menu. If so, you have quick access to the most-used citation templates for your wiki. (Instructions for adding extra citation templates to your local wiki are available at VisualEditor/Citation tool.) |  |
| Pressing on a template icon such as "Cite book" will take you into the template editor for that template. Important information fields may be marked with an asterisk. While the most common fields will be shown, not all of them are required. |  |
| To add more parameters, scroll down in the template editor and press on the "Add" option.
Press on "Indsæt" when you are done. |
 |
Editing images and other media files
Uploading images
Editing media galleries
Editing templates
The powerful MediaWiki template system lets you insert dynamic content, text from other pages, and much more. For a detailed explanation and examples, see the Templates help page.
In the VisualEditor you can search for a relevant template, add an invocation or transclusion on the page you’re editing and, if needed, add custom content using parameters.
Insert new template
| For at tilføje en ny skabelon til siden, skal du placere markøren det sted, du vil indsætte den, og derefter klikke på "$template"-ikonet (puslebrik) i "$insert"-menuen i værktøjslinjen. Then open the Indsæt menu and select " |
 |
| Find the template you want to insert by typing either its name or a relevant keyword. Results containing the search term in either the name or description will display in a dropdown. This should help you find a relevant template, even if you don’t know its exact name.
If you’re having trouble finding the kind of template you want by using keywords, you can look on other wiki pages with similar content and view or edit the page source to see which templates are in use. When you find the desired template’s name, you can type it into this field to insert it here. |
 |
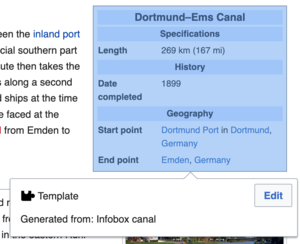
| You can also edit a template that’s already on a page. When you select the template you want to edit, it turns blue, and a box appears displaying " |
 |
| Some templates are not visible to someone reading a page. In the visual editor, such hidden templates are still shown so that you can click and edit or delete them. The name of the template will be shown next to the puzzle icon and both will be grayed out. |  |
|
Skabelonparametre | |
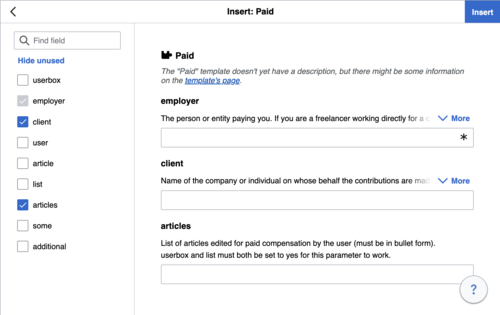
| You’ll see this dialog box when you’re adding a new template or editing one already in place. What you see in the box depends on whether the template in question contains TemplateData, helpful metadata added by other editors to make it easier to edit templates in the Visual Editor.
When a template contains TemplateData, the VisualEditor can use it to present annotated fields for you to fill in.
|
 |
| You can disable any optional parameter (which have blue checkboxes on the left side). If a parameter’s checkbox is grayed out and not clickable, the template requires that parameter, so it can’t be disabled.
When you insert a new template, you may find that some optional parameters are pre-selected. That means the author(s) of the template recommends the use of those parameters. It’s best to review all parameters that will be used in a template to ensure you understand their use. Clicking an unchecked parameter adds it to the template. Clicking a parameter that’s already been added takes you to the parameter’s input field. Some template parameters will show as “deprecated”. Don’t use deprecated parameters when inserting a template; they’re only visible to you because those parameters are in use on older pages where this template was included. |
 |
Adding undocumented parameters | |
| If you’re inserting or editing a template whose author hasn’t laid out its parameters in TemplateData, it has what we call “undocumented” or “unnamed parameters”. In these cases, you should consult the page for the template itself. There you can learn how to correctly employ and work with all of the template’s parameters. This includes learning the exact names of the parameters as written by the template author.
If you find in the documentation that the template expects parameters without names, fill in numbers as placeholders for the parameter names using the undocumented parameter input, then add text to the values you want to provide as you normally would. Example:
If you accidentally include nonexistent, misspelled or erroneous parameters, the values you enter for those parameters won’t show up on the page you’re editing. |
 |
Autogenerated parameters | |
| In this example, the template in question lacks TemplateData but it was possible to autogenerate the parameters. This means that the undocumented parameters have already been added for you, but the names may not be easily understandable and the dialog cannot display any directions or descriptions. As a result the dialog box provides a link to the template’s documentation, which should help you deduce and fill in the template’s various parameters. |  |
Editing multi-part template content | |
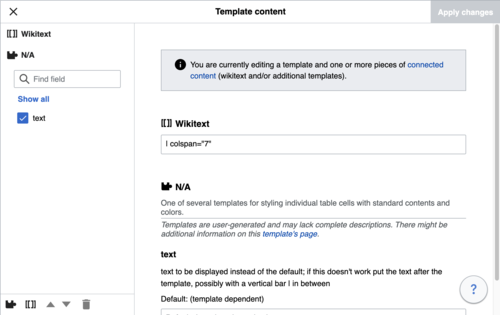
| During editing, you may open template content consisting of multiple templates or a single template linked to some wikitext. This differs from the nested templates described below. In this case, the templates are better visualized as being stacked or connected.
This content often contains “unbalanced templates,” templates which are incomplete on their own and need to be paired with some wikitext or another template in order to function. These related pieces of template content must be created in wikitext, but can be edited in the VisualEditor. In these cases you will see a notice at the top of the dialog to signal the situation and a specialized toolbar will be visible at the bottom of the sidebar. There you can use the icon buttons to add additional templates, additional wikitext, delete elements or change their order. |
 |
Nested templates | |
| Templates can include other templates as the value for parameters. You’ll recognize it when you see a parameter whose value contains the double curly braces ( {{ }} ) denoting a template.
The VisualEditor can’t present this template within a template (a nested template) using the editor’s easy-to-use interface, so if you want to nest a template yourself, you’ll need to understand how to add the template by hand in wikitext into the appropriate parameter field. |
 |
Completing your edit | |
| When you have finished editing a template, you can click "Anvend ændringer". Then you can preview your edit and make sure it looks the way you want and expect.
You may also see an error message, which (like the other TemplateData mentioned above) is community-provided content and may vary in usefulness. You may need to consult the template’s own documentation to get to the bottom of some errors. If you’re still having trouble, consider posting about your problem on the template’s talk page. |
|
Removing a template | |
| To remove a template in the VisualEditor, click the template box. Press the "Delete" or "Backspace" key on your keyboard. The template will disappear from the page. |  |
Editing on mobile | |
| When editing a template on a page using the VisualEditor on a mobile device, you’ll see that the sidebar starts out hidden. You can make it visible by pressing the “Show/hide options” button. |  |
Udskifte skabeloner | |
| When you insert a template in a wiki page, its content and appearance are reevaluated every time the page loads, based on the template code and the values of its parameters. This means if someone updates the code of a template, then every page which uses that template will also get updated when they publish.
There’s another, much less common way to use templates, though, and that’s to substitute a template. Doing this permanently includes the template content just as it appears at the moment you insert it. It will not update if the template code is later changed. Most users won’t ever need to resort to substitution. Substitution is typically only useful when you need to capture the exact appearance of one version of a template, such as when content is under development and needs evaluation. To substitute a template in the VisualEditor, insert a template using the name syntax When you’re finished, press “Indsæt”, which will insert the template content as you see it. |
 |
Editing lists
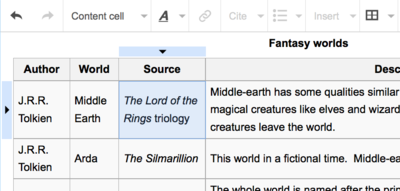
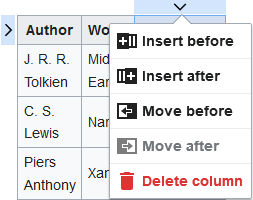
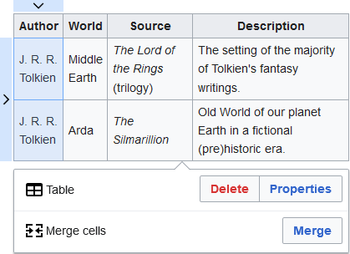
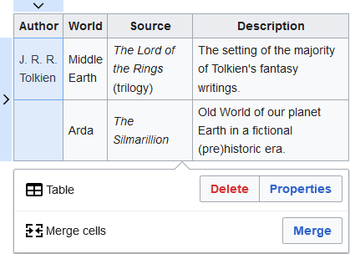
Editing tables
Redigere kategorier
 |
"Sideindstillinger"-gardinmenuen giver dig adgang til "Kategorier"-knappen. |
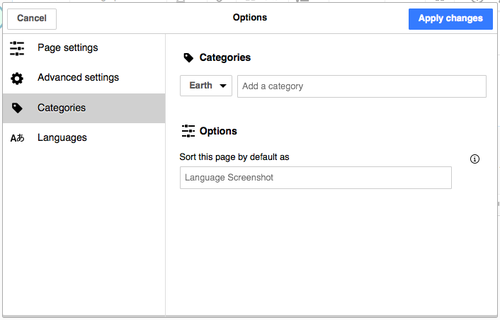 |
"Kategorier"-knappen åbner en dialogboks, der oplister eksisterende kategorier og giver dig mulighed for at tilføje nye.
You also have the option of setting or changing the general (default) sorting key, which determines where the page appears when listed with other pages in the same category. For example, the default sorting key for the article "George Washington" is "Washington, George". In the category "Presidents of the United States", the article is listed under the letter "W", not the letter "G". |
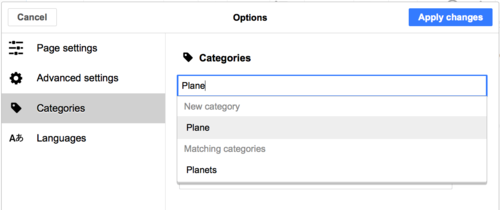 |
To add a category for a page, type the name of the category into the field "Tilføj en kategori". As you type, the visual editor will search for possible matching, existing categories. You can either select an existing category, or you can add a category that doesn't yet have its own category page. (Until that category page is created, your new category will show as a red link after you publish all your editing changes.) |
 |
For at fjerne en eksisterende kategori, skal du klikke på den og klikke på "Fjern"-ikonet (skraldespand) i den dialog, der åbnes automatisk.
Pressing on a category also allows you to specify a sorting key for that specific category. Such a sorting key overrides the default sorting key. |
| Klik på "Anvend ændringer" når du er færdig med at redigere kategorier, og du vil komme tilbage til redigeringen | |
Editing page settings
Editing maps
 |
You can add and change maps. See Help:VisualEditor/Maps. |
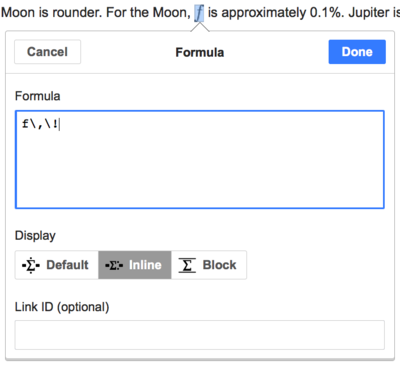
Editing mathematical formulae
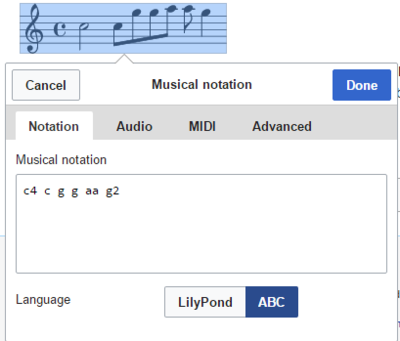
Editing musical scores
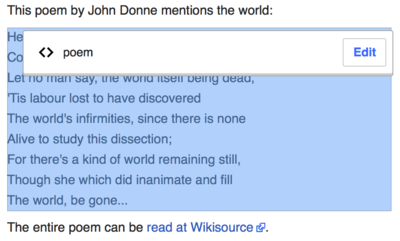
Redigering af digte og andre specielle emner
Switching between the visual and wikitext editors
Tastaturgenveje
Mange skribenter er vant til at indsætte wikiformateret tekst direkte, især fed, kursiv og wikilinks. Tastaturgenveje gør det muligt at indsætte den samme formatering hurtigt uden at behøve klikke på knapperne i værktøjslinjen. Her er de mest almindelige genveje, der kan bruges i VisualEditor:
| PC-genvej | Handling | Mac-genvej |
|---|---|---|
| Ctrl+B | Fed | ⌘ Cmd+B |
| Ctrl+I | Kursiv | ⌘ Cmd+I |
| Ctrl+K | Indsæt link | ⌘ Cmd+K |
| Ctrl+X | Klip | ⌘ Cmd+X |
| Ctrl+C | Kopier | ⌘ Cmd+C |
| Ctrl+V | Indsæt | ⌘ Cmd+V |
| Ctrl+Z | Fortryd | ⌘ Cmd+Z |
Also see the full list of all keyboard shortcuts.
