Help:Images
| Note: When you edit this page, you agree to release your contribution under the CC0. See Public Domain Help Pages for more info. |
This page explains the image syntax when editing the wiki. You or another user must usually upload an image before you can use it on a page.
Images that are stored on a MediaWiki server are usually rendered by using the File: namespace prefix (but the legacy Image: namespace prefix is still supported as a synonym) as the target of a MediaWiki link.
The alternate Media: namespace prefix is also usable to reference the original media file content (for rendering or downloading it separately, out of any MediaWiki page).
Requisites
Before using images in your page, the system administrator of your wiki must have enabled file uploads and a user has to upload the file. System administrators may also set the wiki to accept files from foreign repositories, such as the Wikimedia Commons. For server side image resizing it is necessary to have a scaler configured (such as GD2, ImageMagick, etc.).
Supported media types for images
The following file formats are supported by default:
.jpgor.jpeg- bitmap image compressed in the standard JPEG format (this lossy format is most suitable for photographs)..png- bitmap image in the Portable Network Graphics format (specified by the W3 Consortium)..gif- bitmap image in the legacy Graphics Interchange Format..webp- WebP supports both lossy and lossless compression while reducing image size by up to 45%.
Other formats used on Wikimedia, and commonly enabled elsewhere (these may require extra set-up beyond what is enabled by default):
.svg- scalable image in the Scalable Vector Graphics format (specified by the W3 Consortium). See Manual:Image Administration#SVG..tiff- Tagged image format. Often used for high-resolution archival photographs. Often used with Extension:PagedTiffHandler..ogg,.oga,.ogv- Ogg multimedia (audio or video). Not an image format, but treated similarly. Often used with Extension:TimedMediaHandler.pdf- multipaged documents in the Portable Document Format (initially specified by Adobe). Often used in conjunction with Extension:PdfHandler.djvu- multipaged bitmap documents in the DejaVu format (most often, scans of books). See Manual:How to use DjVu with MediaWiki- Only a single page of a
.pdfor.djvufile is shown at one time.
- Only a single page of a
Other media types may be supported, but it may not be possible to display them inline.
Rendering a single image
Syntax
The full syntax for displaying an image is:
[[File:filename.extension|options|caption]]
where options can be empty or containing one or more of the following lower-case words, separated by pipes (|):
- Format option: border, and one of frameless, frame (or framed), or thumb (or thumbnail). Note: border can be used in combination with frameless but will be ignored if used with one of the other options.
- Controls how the rendered image is formatted and embedded in the rest of the page.
- Resizing option: one of
- {width}px — Resizes the image to fit within the given maximum width in pixels, without restricting its height. (Only whole-number pixel values are supported. A space character between the width value and "px" is permitted.)
- x{height}px — Resizes the image to fit within the given maximum height in pixels, without restricting its width. Only whole-number pixel values are supported. A space character between the height value and "px" is permitted.
- {width}x{height}px — Resizes the image to fit within the given width and height in pixels. Only whole-number pixel values are supported. A space character between the width value and "px" is permitted.
- upright — Resizes an image to a multiple of the user's thumbnail size preferences (see
$wgThumbLimits) – or the default thumbnail size, for logged-out users or logged-in users who have not changed their preferences – to fit within reasonable dimensions. This option is often useful for images whose height is larger than their width. Requires either thumb or frameless. Setting|upright=1.0|will display the image at the user's default image width.|upright=2.0|will display the image at double the user's default width.
- The image will always retain its aspect ratio.
- Images in non-scalable media types can be reduced in size, but not increased; e.g., bitmap images cannot be scaled up.
- The
uprightsetting does not require an equals sign, i.e.|upright 2.0|works the same as|upright=2.0|. - When used without a value or an equals sign (e.g.,
|upright|), defaults to|upright=0.75|(although|upright=|is the same as|upright=1.0|) - The default maximum size depends on the format and the internal image dimensions (according to its media type).
- Horizontal alignment option: one of left, right, center, none. If multiple of these options are present, only the first one will be used
- Controls the horizontal alignment (and inline/block or floating styles) of the image within a text (no default value).
- Vertical alignment option: one of baseline, sub, super, top, text-top, middle, bottom, text-bottom
- Controls the vertical alignment of a non-floating inline image with the text before or after the image, and in the same block (the default vertical alignment is middle).
- Link option: one of
- link={target} — Allows to change the target (to an arbitrary page title, or URL) of the generated link, activable on the rendered image surface; e.g.
[[File:Example.jpg|20px|link=http://www.wikipedia.org]]renders as (external link), or
 [[File:Example.jpg|20px|link=MediaWiki]]renders as (internal link). - link= (with an empty value) — (MediaWiki 1.14+) Displays an image without any activable link; e.g.
[[File:Example.jpg|20px|link=]]renders as .
- If there is a space character between
linkand the equals sign, the link statement will be treated as a caption. - Including some HTML character equivalents, like
%22for", can cause the link statement to be treated as a caption (see phabricator:T306216). - ! for MW 1.24 and lower: If you set
|link=|(empty), then notitlewill be rendered. (See phabricator:T23454.)
- link={target} — Allows to change the target (to an arbitrary page title, or URL) of the generated link, activable on the rendered image surface; e.g.
- Other specific options:
- alt={alternative text} — (MediaWiki 1.14+) Defines the alternative text (maps to the HTML attribute
alt="..."of the generated<img />element) of an image that will be rendered if either the referenced image cannot be downloaded and embedded, or if the support media must use the alternative description text (e.g. when using a Braille reader or with accessibility options set by the user in its browser).
- If there is a space character between
altand the equals sign, the alt statement will be treated as a caption.
- page={number} — Renders the specified page number (currently only applicable when showing a .djvu or .pdf file).
- thumbtime={number} — Renders a thumbnail from the video at the specified timestamp in seconds or MM:SS or HH:MM:SS format (only applicable when showing a video file).
- start={number} — When video playback is started it will start at the specified timestamp in seconds or MM:SS or HH:MM:SS format (only applicable when showing a video file).
- muted — When media playback is started, audio will be muted.
- loop — Media will loop continuously. (only applies to audio and video)
- lossy={false} — (PagedTiffHandler) For using PNG instead of JPG thumbnails for Tiff images
- class={html class} — (MediaWiki 1.20+)Defines classes (maps to the HTML attribute
class="..."of the generated<span>...</span>element wrapped around the<img />element). - lang={language code} — (MediaWiki 1.22+) For SVG files containing <switch> statements varying on a systemLanguage attribute, selects what language to render the file in. The default is the page language (defaults to project default language on most projects).
- alt={alternative text} — (MediaWiki 1.14+) Defines the alternative text (maps to the HTML attribute
If a parameter does not match any of the other possibilities, it is assumed to be the caption text. If more than one non-parameter string is present, the final non-parameter string will be used as the caption. Caption text shows below the image in thumb and frame formats, or as tooltip text in any other format. Caption text displayed in the thumb and frame formats may contain wiki links and other formatting. MediaWiki extensions can add additional options.
If 'alt' is not specified and a caption is provided, the alternative text will be created automatically from the caption, stripped of formatting, except when in thumb or frame mode since the caption is already readable by screen readers in that case.
Format
The following table shows the effect of all available formats.
| Description | You type | You get |
|---|---|---|
| no format specified Rendered as a floating block: no Rendered inline: yes Rendered caption: no |
... text text text [[File:example.jpg|caption]] text text text ... |
... text text text
|
| border results in a very small gray border Rendered as a floating block: no Rendered inline: yes Rendered caption: no |
... text text text [[File:example.jpg|border|caption]] text text text ... |
... text text text
|
| frameless, like thumbnail, respect user preferences for image width, but without border and no right float Rendered as a floating block: no Rendered inline: yes Rendered caption: no |
... text text text [[File:example.jpg|frameless|caption]] text text text ... |
... text text text
|
| frameless and border Rendered as a floating block: no Rendered inline: yes Rendered caption: no |
... text text text [[File:example.jpg|frameless|border|caption]] text text text ... |
... text text text
|
| frame Rendered as a floating block: yes Rendered inline: no Rendered caption: yes |
... text text text [[File:example.jpg|frame|caption]] text text text ... |
... text text text
 text text text ... |
| thumb or thumbnail Rendered as a floating block: yes Rendered inline: no Rendered caption: yes |
... text text text [[File:example.jpg|thumb|caption]] text text text ... |
... text text text
text text text ... |
When the height of an image in thumbnail is bigger than its width (i.e. in portrait orientation rather than landscape) and you find it too large, you may try the option upright=N, where N is the image's aspect ratio (its width divided by its height, defaulting to 0.75).
The alternative is to specify the desired maximum height (in pixels) explicitly.
Note that by writing thumb={filename}, you can use a different image for the thumbnail.
Size and frame
Among different formats, the effect of the size parameter may be different, as shown below.
- For how it appears when its size is not specified, see Format section above.
- When the format is not specified, or only
bordered, the size can be both reduced and enlarged to any specified size. - In the examples below, the original size of the image is 400×267 pixels.
- An image with
framealways ignores the size specification; the original image will be reduced if it exceeds the maximum size defined in user preferences, and the page information will display a Linter error. - The size of an image with
thumborframelesscan be reduced, but cannot be enlarged beyond the original size of the image.
| Format | Reduced | Enlarged |
|---|---|---|
| (not specified) |
[[File:example.jpg|50px]]
|
[[File:example.jpg|500px]]
|
| border |
[[File:example.jpg|border|50px]]
|
[[File:example.jpg|border|500px]]
|
| frame |
[[File:example.jpg|frame|50px]] |
[[File:example.jpg|frame|500px]]
|
| thumb |
[[File:example.jpg|thumb|50px]] |
[[File:example.jpg|thumb|500px]]
|
| frameless |
[[File:example.jpg|frameless|50px]]
|
[[File:example.jpg|frameless|500px]]
|
Horizontal alignment
Note that when using the frame or thumb[nail] formats, the default horizontal alignment will be right for left-to-right languages, and left for right-to-left languages.
| Description | You type | You get |
|---|---|---|
| no horizontal alignment specified, or default alignment Rendered as a floating block: no Rendered inline: yes |
... text text text [[File:example.jpg|100px|caption]] text text text ... |
... text text text
|
| specify horizontal alignment as: none Rendered as a floating block: no Rendered inline: no |
... text text text [[File:example.jpg|none|100px|caption]] text text text ... |
... text text text
text text text ... |
| specify horizontal alignment as: center Rendered as a floating block: no Rendered inline: no |
... text text text [[File:example.jpg|center|100px|caption]] text text text ... |
... text text text
text text text ... |
| specify horizontal alignment as: left Rendered as a floating block: yes Rendered inline: no |
... text text text [[File:example.jpg|left|100px|caption]] text text text ... |
... text text text
text text text ... |
| specify horizontal alignment as: right Rendered as a floating block: yes Rendered inline: no |
... text text text [[File:example.jpg|right|100px|caption]] text text text ... |
... text text text
text text text ... |
Vertical alignment
The vertical alignment options take effect only if the image is rendered as an inline element and is not floating. They alter the way the inlined image will be vertically aligned with the text present in the same block before and/or after this image on the same rendered row.
Note that the rendered line of text where inline images are inserted (and the lines of text rendered after the current one) may be moved down (this will increase the line-height conditionally by additional line spacing, just as it may occur with spans of text with variable font sizes, or with superscripts and subscripts) to allow the image height to be fully displayed with this alignment constraint.
<p style="border:1px solid #AAA;padding:0;font-size:150%;line-height:2">
<span style="background:#FFF;color:#000;text-decoration:overline"><u><del>text</del>
'''top:''' [[File:Example.jpg|20px|top]] [[File:Example.jpg|40px|top]] [[File:Example.jpg|100px|top]]
<del>text</del></u></span></p>

<p style="border:1px solid #AAA;padding:0;font-size:150%;line-height:2">
<span style="background:#FFF;color:#000;text-decoration:overline"><u><del>text</del>
'''text-top:''' [[File:Example.jpg|20px|text-top]] [[File:Example.jpg|40px|text-top]] [[File:Example.jpg|100px|text-top]]
<del>text</del></u></span></p>

<p style="border:1px solid #AAA;padding:0;font-size:150%;line-height:2">
<span style="background:#FFF;color:#000;text-decoration:overline"><u><del>text</del>
<sup>super:</sup> [[File:Example.jpg|20px|super]] [[File:Example.jpg|40px|super]] [[File:Example.jpg|100px|super]]
<del>text</del></u></span></p>

<p style="border:1px solid #AAA;padding:0;font-size:150%;line-height:2">
<span style="background:#FFF;color:#000;text-decoration:overline"><u><del>text</del>
'''baseline:''' [[File:Example.jpg|20px|baseline]] [[File:Example.jpg|40px|baseline]] [[File:Example.jpg|100px|baseline]]
<del>text</del></u></span></p>

<p style="border:1px solid #AAA;padding:0;font-size:150%;line-height:2">
<span style="background:#FFF;color:#000;text-decoration:overline"><u><del>text</del>
<sub>'''sub:'''</sub> [[File:Example.jpg|20px|sub]] [[File:Example.jpg|40px|sub]] [[File:Example.jpg|100px|sub]]
<del>text</del></u></span></p>

<p style="border:1px solid #AAA;padding:0;font-size:150%;line-height:2">
<span style="background:#FFF;color:#000;text-decoration:overline"><u><del>text</del>
'''default:''' [[File:Example.jpg|20px]][[File:Example.jpg|40px]] [[File:Example.jpg|100px]]
<del>text</del></u></span></p>

<p style="border:1px solid #AAA;padding:0;font-size:150%;line-height:2">
<span style="background:#FFF;color:#000;text-decoration:overline"><u><del>text</del>
'''middle:''' [[File:Example.jpg|20px|middle]] [[File:Example.jpg|40px|middle]] [[File:Example.jpg|100px|middle]]
<del>text</del></u></span></p>

<p style="border:1px solid #AAA;padding:0;font-size:150%;line-height:2">
<span style="background:#FFF;color:#000;text-decoration:overline"><u><del>text</del>
'''text-bottom:''' [[File:Example.jpg|20px|text-bottom]] [[File:Example.jpg|40px|text-bottom]] [[File:Example.jpg|100px|text-bottom]]
<del>text</del></u></span></p>

<p style="border:1px solid #AAA;padding:0;font-size:150%;line-height:2">
<span style="background:#FFF;color:#000;text-decoration:overline"><u><del>text</del>
'''bottom:'' [[File:Example.jpg|20px|bottom]] [[File:Example.jpg|40px|bottom]] [[File:Example.jpg|100px|bottom]]
<del>text</del></u></span></p>
To show the alignment result more clearly, the text spans are overlined and underlined, the font-size is increased to 200%, and the paragraph block is outlined with a thin border; additionally images of different sizes are aligned:
text
top: ![]()
![]()
text
text
text-top: ![]()
![]()
text
text
super: ![]()
![]()
text
text
baseline: ![]()
![]()
text
text
sub: ![]()
![]()
text
text
default: ![]()
![]()
text
text
middle: ![]()
![]()
text
text
text-bottom: ![]()
![]()
text
text
bottom: ![]()
![]()
text
Notes:
- The "middle" vertical alignment position of the image (which is also the default) usually refers to the middle between the x-height and the baseline of the text (on which the vertical middle of the image will be aligned, and on which usually the text may be overstroke), but not to the middle of the line-height of the font-height that refers to the space between the "text-top" and "text-bottom" positions ; the font-height excludes:
- the additional line separation spacing normally divided equally into two line-margins (here 0.5em, according to line-height set to 200%) above and below the font-height).
- the additional line spacing which may be added by superscripts and subscripts.
- However, if the image height causes its top or bottom position to go above or below the normal full line-height of text, the middle position will be adjusted after the increasing the top and/or bottom line-margins so that the image can fit and align properly, and all images (including those with smaller heights) will be vertically centered on the adjusted middle position (for computing the effective line-height, the text of each rendered row with the larger font-height will be considered).
- The "text-top" and "text-bottom" alignment positions also excludes the extra line spacing added by superscripts and subscripts, but not the additional line-spacing defined by the line-height.
- The "top" and "bottom" alignment positions take into account all these extra line spacings (including superscripts and subscripts, if they are present in a rendered line span). When the image alignment constrains the image to grow above or below the normal line-spacing, and the image is not absolutely positioned, the image will cause the "top" and "bottom" positions to be adjusted (just like superscripts and subscripts), so the effective line-height between rendered lines of text will be higher.
- The "underline", "overline" and "overstrike" text-decoration positions should be somewhere within these two limits and may depend on the type and height of fonts used (the superscript and subscript styles may be taken into account in some browsers, but usually these styles are ignored and the position of these decorations may not be adjusted); so these decorations normally don't affect the vertical position of images, relatively to the text.
Stopping the text flow
On occasion it is desirable to stop text (or other inline non-floating images) from flowing around a floating image.
Depending on the web browser's screen resolution and such, text flow on the right side of an image may cause a section header (for instance, == My Header ==) to appear to the right of the image, instead of below it, as a user may expect.
The text flow can be stopped by placing <div style="clear: both"></div> before the text that should start below the floating image.
(This may also be done without an empty line by wrapping the section with the floating images with <div style="overflow: hidden">…</div>, which clears all floats inside the div element.)
All images rendered as blocks (including non-floating centered images, left- or right-floating images, as well as framed or thumbnailed floating images) are implicitly breaking the surrounding lines of text (terminating the current block of text before the image, and creating a new paragraph for the text after them). They will then stack vertically along their left or right alignment margin (or along the center line between these margins for centered images).
Altering the default link target
The following table shows how to alter the link target (whose default is the image description page) or how to remove it. Changing the link does not alter the format described in the previous sections.
| Description | You type | You get |
|---|---|---|
| internal link |
... text text text [[File:example.jpg|link=Main Page|caption]] text text text ... |
... text text text
|
| external link |
... text text text [[File:example.jpg|link=http://wikipedia.org/wiki/Test|caption]] text text text ... |
... text text text
|
| no link (external or file page) |
... text text text [[File:example.jpg|link=|caption]] text text text ... |
... text text text
|
Warning:
- The licencing requirements on your wiki may not allow you to remove all links to the description page that displays the required authors attributions, the copyrights statements, the applicable licencing terms, or a more complete description of the rendered image (including its history of modifications).
- If you change or remove the target link of an image, you will then have to provide somewhere else on your page an explicit link to this description page, or to display the copyright and author statement and a link to the applicable licence, if they are different from the elements applicable to the embedding page itself.
- Your wiki policy may restrict the use of the alternate link parameter, or may even enforce a prohibition of alternate link parameters for embedded media files (in which case, the link parameter will be ignored), or may only accept them after validation by authorized users or administrators.
Rendering a gallery of images
Gallery syntax
It's easy to make a gallery of thumbnails with the <gallery> tag.
The syntax is:
<gallery>
File:file_name.ext|caption|alt=alt language
File:file_name.ext|caption|alt=alt language
{...}
</gallery>
Note that the image code is not enclosed in brackets when enclosed in gallery tags.
Captions are optional, and may contain wiki links or other formatting.
Some of the parameters controlling thumb output can also be used here, specifically the ones that modify the file (as opposed to ones that control where in the page the image falls).
For example, with multi-paged media like pdfs, you can use code like page=4 and with videos you can use thumbtime=10.
The File: prefix can be omitted.
However, it is helpful to include it as an aid for quickly locating image specifiers in the wikitext (for example, when cleaning up page layout).
If the image links to an external site, the caption must come before the link parameter or the caption will not render.
For example:
<gallery>
File:Example.jpg|Item 1
File:Example.jpg|a link to [[Help:Contents]]
File:Example.jpg
File:Example.jpg|alt=An example image. It has flowers
File:Example.jpg|''italic caption''
File:Example.jpg|link=https://example.com|This text will not render because an external link came first
File:Example.jpg|Links to external website|link=https://example.com
File:Example.jpg|link=w:Main_Page|Internal link
Example.jpg|on page "{{PAGENAME}}"
File:Using Firefox.pdf|page=72
</gallery>
is formatted as:
-
 Item 1
 -
a link to Help:Contents
-
-
-
italic caption
-
-
Links to external website
-
Internal link
-
on page "Images"
-


mode parameter
| MediaWiki version: | ≥ 1.22 |
Starting in MediaWiki version 1.22 a mode parameter is available, taking options as follows:
traditionalis the original gallery type used by MediaWiki.nolinesis similar totraditional, but with no border lines.packedcauses images to have the same height but different widths, with little space between the images. The rows in this responsive mode organize themselves according to the width of the screen.packed-overlayshows the caption overlaid on the image, in a semi-transparent white box.packed-hoveris similar topacked-overlay, but with the caption and box only showing up on hover.slideshowcreates a slideshow of the images.
For example:
<gallery mode="packed-hover">
File:Astronotus_ocellatus.jpg|''[[commons:Astronotus ocellatus|Astronotus ocellatus]]'' (Oscar)
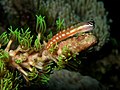
File:Salmonlarvakils.jpg|''[[commons:Salmo salar|Salmo salar]]'' (Salmon Larva)
File:Georgia Aquarium - Giant Grouper.jpg|''[[commons:Epinephelus lanceolatus|Epinephelus lanceolatus]]'' (Giant grouper)
File:Pterois volitans Manado-e.jpg|''[[commons:Pterois volitans|Pterois volitans]]'' (Red Lionfish)
File:Macropodus opercularis - front (aka).jpg|''[[commons:Macropodus opercularis|Macropodus opercularis]]'' (Paradise fish)
File:Canthigaster valentini 1.jpg|''[[commons:Canthigaster valentini|Canthigaster valentini]]'' (Valentinni's sharpnose puffer)
File:Flughahn.jpg|[[File:POTY ribbon 2007.svg|25px]] ''[[commons:Dactylopterus volitans|Dactylopterus volitans]]'' (Flying gurnard)
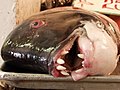
File:Fishmarket 01.jpg|''[[commons:Semicossyphus pulcher|Semicossyphus pulcher]]'' (California Sheephead)
File:Pseudorasbora parva(edited version).jpg|''[[commons:Category:Pseudorasbora parva|Pseudorasbora parva]]'' (Topmouth gudgeon)
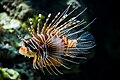
File:MC Rotfeuerfisch.jpg|''[[commons:Category:Pterois antennata|Pterois antennata]]'' (Antennata Lionfish)
File:Cleaning station konan.jpg|''[[commons:Novaculichthys taeniourus|Novaculichthys taeniourus]]''
File:Synchiropus splendidus 2 Luc Viatour.jpg|''[[commons:Synchiropus splendidus|Synchiropus splendidus]]'' (Mandarin fish)
File:Psetta maxima Luc Viatour.jpg|''[[commons:Psetta maxima|Psetta maxima]]'' (Turbot)
File:Australian blenny.jpg|''[[commons:Category:Ecsenius|Ecsenius axelrodi]]''
</gallery>
Gives (mode: packed-hover):
-
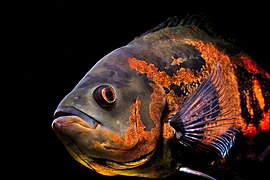 Astronotus ocellatus (Oscar)
 -
 Salmo salar (Salmon Larva)
 -
 Epinephelus lanceolatus (Giant grouper)
 -
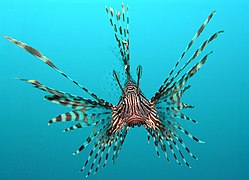 Pterois volitans (Red Lionfish)
 -
 Macropodus opercularis (Paradise fish)
 -
 Canthigaster valentini (Valentinni's sharpnose puffer)
 -

 Dactylopterus volitans (Flying gurnard)
 -
 Semicossyphus pulcher (California Sheephead)
 -
 Pseudorasbora parva (Topmouth gudgeon)
 -
 Pterois antennata (Antennata Lionfish)
 -
-
 Synchiropus splendidus (Mandarin fish)
 -
 Psetta maxima (Turbot)
 -


.jpg)


.jpg)


Examples of the other modes:
mode="traditional"
-
 Astronotus ocellatus (Oscar)
 -
 Salmo salar (Salmon Larva)
 -
 Epinephelus lanceolatus (Giant grouper)
mode="nolines"
-
Astronotus ocellatus (Oscar)
-
Salmo salar (Salmon Larva)
-
Epinephelus lanceolatus (Giant grouper)
mode="packed"
-
Astronotus ocellatus (Oscar)
-
Salmo salar (Salmon Larva)
-
Epinephelus lanceolatus (Giant grouper)
mode="packed-overlay"
-
Astronotus ocellatus (Oscar)
-
Salmo salar (Salmon Larva)
-
Epinephelus lanceolatus (Giant grouper)
mode="packed-hover"
-
Astronotus ocellatus (Oscar)
-
Salmo salar (Salmon Larva)
-
Epinephelus lanceolatus (Giant grouper)
| MediaWiki version: | ≥ 1.28 |
mode="slideshow"
-
Astronotus ocellatus (Oscar)
-
Salmo salar (Salmon Larva)
-
Epinephelus lanceolatus (Giant grouper)
-
 Pterois volitans (Red Lionfish)
 -
 Macropodus opercularis (Paradise fish)
 -
 Canthigaster valentini (Valentinni's sharpnose puffer)
 -
 Dactylopterus volitans (Flying gurnard)
 -
 Semicossyphus pulcher (California Sheephead)
 -
 Pseudorasbora parva (Topmouth gudgeon)
 -
 Pterois antennata (Antennata Lionfish)
 -

-
 Synchiropus splendidus (Mandarin fish)
 -
 Psetta maxima (Turbot)
 -
Optional gallery attributes
The gallery tag itself takes several additional parameters, specified as attribute name-value pairs:
<gallery {parameters}>
{images}
</gallery>
caption="{caption}": (caption text between double quotes for more than one word) sets a caption centered atop the gallery. Only plain text may be used in the caption; formatting, templates and the like will not work.widths={width}: sets the (max) widths of the images in pixels; the default value is 120px. (It has no effect if mode is set to one of the following: packed, packed-overlay, packed-hover, slideshow.) Note the plural: widths.heights={heights}: sets the (max) heights of the images in pixels; the default value is 120px. (It has no effect if mode is set to slideshow.)perrow={integer}: sets the number of images per row. (It has no effect if mode is set to one of the following: packed, packed-overlay, packed-hover, slideshow.) The default isperrow=0which automatically adjusts the number of images per row based on width of screen.showfilename={anything}: Show the filenames of the images in the individual captions for each image (1.17+).mode={traditional|nolines|packed|packed-hover|packed-overlay|slideshow}: See section above (1.22+; 1.28+ for "slideshow").showthumbnails: For "slideshow" mode only, display the strip with image thumbnails below the slideshow by default (1.29+).- Any html attribute allowed on a
<ul>tag (e.g.id,title,class)
- Example 1
Syntax:
<gallery widths=300 heights=200>
File:Example.jpg|Lorem ipsum
File:Example.jpg|Lorem ipsum dolor sit amet, consetetur sadipscing elitr, sed diam nonumy eirmod tempor invidunt ut
</gallery>
Result:
-
 Lorem ipsum
 -
Lorem ipsum dolor sit amet, consetetur sadipscing elitr, sed diam nonumy eirmod tempor invidunt ut
- Example 2
Syntax:
<gallery widths=60 heights=60 perrow=7 caption="sunflowers are groovy">
File:Example.jpg
File:Example.jpg
File:Example.jpg
File:Example.jpg
File:Example.jpg
File:Example.jpg
File:Example.jpg
File:Example.jpg
File:Example.jpg
File:Example.jpg
</gallery>
Result:
- sunflowers are groovy
-

-
-
-
-
-
-
-
-
-
Row of images that will wrap to browser width
One way that works for a row of images with varying widths is not to use "thumb" or "left" or "none". If "thumb" is not used (and thus no captions) a row of images will wrap to the browser width. If necessary, narrow the browser window to see the images wrap to the next row.
[[File:Example.jpg|220px]]
[[File:Example.jpg|100px]]
[[File:Example.jpg|150px]]
[[File:Example.jpg|250px]]
[[File:Example.jpg|200px]]
[[File:Example.jpg|50px]]
[[File:Example.jpg|220px]]
[[File:Example.jpg|175px]]
![]()
To wrap images of varying widths with captions it is necessary to use div HTML for an unordered list. Along with style="display: inline-block;". For more info and ideas see: Give Floats the Flick in CSS Layouts.
<div><ul>
<li style="display: inline-block;"> [[File:Example.jpg|thumb|none|220px|Caption 1]] </li>
<li style="display: inline-block;"> [[File:Example.jpg|thumb|none|100px|Caption 2]] </li>
<li style="display: inline-block;"> [[File:Example.jpg|thumb|none|150px|Caption 3]] </li>
<li style="display: inline-block;"> [[File:Example.jpg|thumb|none|250px|Caption 4]] </li>
<li style="display: inline-block;"> [[File:Example.jpg|thumb|none|200px|Caption 5]] </li>
<li style="display: inline-block;"> [[File:Example.jpg|thumb|none|50px|Caption 6]] </li>
<li style="display: inline-block;"> [[File:Example.jpg|thumb|none|220px|Caption 7]] </li>
<li style="display: inline-block;"> [[File:Example.jpg|thumb|none|175px|Caption 8]] </li>
</ul></div>
-
Caption 1 -

Caption 2 -
Caption 3 -

Caption 4 -
Caption 5 -

Caption 6 -
Caption 7 -

Caption 8
To align the top edge of images add the vertical-align command
<div><ul>
<li style="display: inline-block; vertical-align: top;"> [[File:Example.jpg|thumb|none|220px|Caption 1]] </li>
<li style="display: inline-block; vertical-align: top;"> [[File:Example.jpg|thumb|none|100px|Caption 2]] </li>
<li style="display: inline-block; vertical-align: top;"> [[File:Example.jpg|thumb|none|150px|Caption 3]] </li>
<li style="display: inline-block; vertical-align: top;"> [[File:Example.jpg|thumb|none|250px|Caption 4]] </li>
<li style="display: inline-block; vertical-align: top;"> [[File:Example.jpg|thumb|none|200px|Caption 5]] </li>
<li style="display: inline-block; vertical-align: top;"> [[File:Example.jpg|thumb|none|50px|Caption 6]] </li>
<li style="display: inline-block; vertical-align: top;"> [[File:Example.jpg|thumb|none|220px|Caption 7]] </li>
<li style="display: inline-block; vertical-align: top;"> [[File:Example.jpg|thumb|none|175px|Caption 8]] </li>
</ul></div>
-
Caption 1 -
Caption 2 -
Caption 3 -
Caption 4 -
Caption 5 -
Caption 6 -
Caption 7 -
Caption 8
Some wiki farms do not have all gallery options (such as "widths"). Also, sometimes one wants varying widths for images in a row. Outside of a gallery, or the div HTML, it is impossible to have individual captions for images in a row of images that will wrap to the browser width. Try it and see. Nothing else using wikitext works correctly. Images will either overlap stuff on the right, or force a horizontal scroll bar.
Using a left float ("left") for some images, combined with "none" for some of the images, will not work consistently either, especially if there is also a right sidebar of images. Weird things will occur. At narrower browser or screen widths an image out of the row may appear far down the page after the end of the right sidebar of images.
Link behavior
By default an image links to its file description page. The "link=" option modifies this behavior to link to another page or website, or to turn off the image's linking behavior.
Alternatively, you can create a text link to a file description page or to the file itself. See Help:Linking to files.
Display image, link it to another page or website
Use "link=" option to link image to another page or website:
Clicking on the below image will take you to MediaWiki:
[[File:MediaWiki-2020-logo.svg|50px|link=MediaWiki]]
![]()
Clicking on the below image will take you to example.com:
[[File:MediaWiki-2020-logo.svg|50px|link=http://example.com]]
![]()
Display image, turn off link
Use "link=" option with no value assigned to turn link off entirely; the below image is not a link:
[[File:MediaWiki-2020-logo.svg|50px|link=]]
![]()
Link to an image
Add : as a prefix to the link you need to create.
[[:File:MediaWiki-2020-logo.svg]]
[[:File:MediaWiki-2020-logo.svg|Wiki]]
Directly linking to an image
The above examples link to the image's description page.
To directly link to an image, the pseudo-namespace Media: can be used on MediaWiki pages:
[[Media:MediaWiki-2020-logo.svg]]
Direct links from external sites
Another possibility is to use the Special:Redirect/file page (or its alias Special:Filepath). Unlike the above example, you can link to it from external websites as well as from MediaWiki pages.
[[Special:Redirect/file/Wikipedia.png]]
The parameters height and width can also be added to return a specific size of the image.
The image aspect ratio is always preserved.
https://www.mediawiki.org/w/index.php?title=Special:Redirect/file/Wikipedia.png&width=100&height=100
Obtaining the full URL of an image
To obtain the full path of an image (without going through redirects as shown above), some Magic words can be used.
{{filepath:MediaWiki-2020-logo.svg}}
Becomes:
- //upload.wikimedia.org/wikipedia/commons/d/dd/MediaWiki-2020-logo.svg
In the event that this is used from a template where the File: namespace needs to be removed, {{PAGENAME}} can do so:
{{filepath:{{PAGENAME:File:MediaWiki-2020-logo.svg}}}}
Becomes:
- //upload.wikimedia.org/wikipedia/commons/d/dd/MediaWiki-2020-logo.svg
Files at other websites
You can link to an external file available online using the same syntax used for linking to an external web page. With these syntaxes, the image will not be rendered, but only the text of the link to this image will be displayed.
[http://url.for/some/image.png]
Or with a different displayed text:
[http://url.for/some/image.png link text here]
Additional MediaWiki markup or HTML/CSS formatting (for inline elements) is permitted in this displayed text (except for embedded links that would break the surrounding link):
[http://www.example.com/some/image.png Example '''<del>rich</del>''' ''<ins>link text</ins>'' here.]
which renders as: Example rich link text here.
If it is enabled on your wiki (see Manual:$wgAllowExternalImages), you can also embed external images. To do that, simply insert the image's URL:
http://url.for/some/image.png
Embedded images can be resized by the CSS transform property. They also may be formatted by surrounding MediaWiki markup or HTML/CSS code.
If this wiki option is not enabled, the image will not be embedded but rendered as a textual link to the external site, just like above, unless the site's Manual:$wgAllowExternalImagesFrom has a value.
It is also possible to use InstantCommons (enabled by default) or other shared file repositories to load files from other wikis, which are treated as if they were local images.